Professional Services

This article describes the creation and setup of a certificate for HTTPS on a Tomcat server running on Windows. Its purpose isn't to present every possible option, but the selected one that gets the job done.
When using cloud services such as Google Cloud HTTPS LoadBalancer, it is mandatory to have SSL certificates setup for proper HTTPS functioning. Obtaining them is very easy. Google pretty much does everything for you.
Even when your infrastructure runs on your own hardware, it's still easy as long as you use a unix-like OS. The free certification authority Lets Encrypt's certbot automates most of the things needed. You just need to meet some fairly obvious requirements. Certbot, however, doesn't run on Windows, and there's no direct replacement for it.
So what if you're stuck on a Windows machine, and you have no idea what to do, like I was?
Let me show you one thing you can do:
Behind the scenes
Certificates,validations and keys
When connecting to the certification authority (CA, eg. LetsEncrypt) for the first time, your agent (eg. certbot) generates a private/public key pair.
Note: I used to think that the agent has to run on the machine with the web server itself. This is not true. However, it's very convenient for auto-renewal.
When you request validation using your domain, the agent sends the public key to the CA, and the CA provides two ways to prove that you indeed own the domain - or what it's pointing to - to complete a challenge. The first way is modifying a DNS record of the domain, which also allows you to create certificates for * (eg. *.bar.baz), and the second way is placing a file on the web server that the domain points to. After the challenge is complete, the CA authorises the keypair.
With the authorised keypair, you can request, renew, or revoke certificates as you wish, without further obstacles. The certificates are generally stored in a secure directory, and you can move them to the server as you need.
Connection over HTTPS
First, both the client and the server check the versions of TLS and agree on a cipher suite.
Then, the server sends it's certificates, with a public key. Among its own certificates, there's a "root" certificate, which is a certificate of the CA. The client validates the information in the certificates with the CA (eg. LetsEncrypt).
Lastly - and this is the fun part - the server and the client both agree on a key for symmetric encryption, but they first have to use asymmetric encryption to do so.

The client takes the public key provided by the server, encrypts a random, newly generated key with it, and sends it to the server, which decrypts it using its securely held private key.
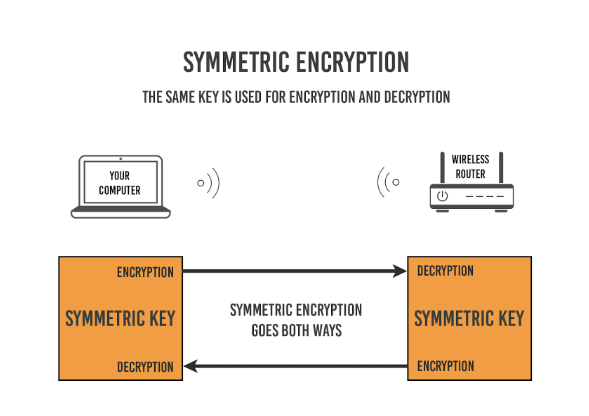
All subsequent communication will be encrypted with the generated key.
Now, you may ask "Why not just use asymmetric encryption for everything?". The reason for that is the higher computational power needed for asymmetric encryption over symmetric encryption.
Note: Public and private keys are just normal files on your computer
Setup
Getting Posh-ACME
Posh-ACME is a very nicely written PowerShell module. While it doesn't have all the nice-to-have functionality of certbot, such as the
--standalone option or web server plugins, it does everything else.
Note: --standalone creates an ad-hoc web server, where the challenge file is placed automatically. This is only useful on a machine that the domain already points to.
Run
> Install-Module -Name Posh-ACME -Scope CurrentUser
in PowerShell. Leave out -Scope CurrentUser if you run the shell as Administrator, which will install it globally.
Note that as of the time of writing this article, the .NET 4.7.1 requirement is very important, as the certificate creation process will fail if you run 4.7 or below.
Python (optional)
If you're already running tomcat, or some different webserver, you don't need this.
You can use python for creating the ad-hoc webserver. Certbot, which is written in python, probably uses the exact same command internally that we will use here.
I downloaded the x86_64 embeddable .zip file with Python 3, which you don't need to install, from python's website. Extract it somewhere. Visual C++ Redistributable is required for this. Go inside the folder, and copy the path to python.exe by right clicking on it while holding shift and pressing Copy as path.
Open a new PowerShell window. First, make a new folder (mkdir), and change the current folder (cd) for it. Then, start the server. Use the right click to paste your actual path to python.
> C:\Users\foo\python\python.exe -m http.server 80
Folder structure
You must make a file with a specific path, name, and content within the root of the web server. In most cases, this can be achieved by creating a folder named .well-known, and a folder named acme-challenges within it. Later, you will create a file within the latter folder.
Routing
Make sure that the domain points to wherever you're hosting your instance, and that port 80 is unobstructed.
Getting the certificates
Open a new PowerShell shell, and input the following commands
> Set-PAServer LE_STAGE

> New-PAAccount -AcceptTOS -Contact 'foo@bar.baz'> New-PAOrder 'bar.baz'

> $auths = Get-PAOrder | Get-PAAuthorizations

> $toPublish = $auths | Select @{L='Url';E={"http://$($_.fqdn)/.well-known/acme-challenge/$($_.HTTP01Token)"}}, @{L='Body';E={Get-KeyAuthorization $_.HTTP01Token (Get-PAAccount)}}
Now, when you input just $toPublish, it will show the variables content, and it will contain the path that the validator will check, and what it expects to find inside. Navigate into the acme-challenge folder, and create a text file with the name and contents that you see in the $toPublish variable.
Now you can run
> $auths.HTTP01Url | Send-ChallengeAck,
which submits your domain for validation. If it succeeds, the output of
> Get-PAOrder | Get-PAAuthorizations
will say "valid" under "HTTP01Status". Now you can run
> New-PACertificate $auths.fqdn,
which will store the certificates in %LocalAppData%.
Run
> Get-PACertificate | fl
to see where exactly they're stored.
Renew certificates by running
> Submit-Renewal
Configuring the certificate in Tomcat
We're interested in the fullchain.pfx file, which contains the root key, the chain, and the private key, in the PKCS12 format that Java uses. Make a copy of it in Tomcat's certs directory, and rename the copy to something more descriptive, like domainname_cert.pfx.
Now, make changes to Tomcat's config.xml, within the HTTPS connector. Note that you might need to comment it out.
-
Change the value of "keystoreFile" to the name of your .pfx file
-
Change the value of "keystorePass" to "poshacme"
-
Change the value of "keystoreType" to "pkcs12" - this option is present in Tomcat version 8 and onwards.
Now just restart tomcat and try connecting to your website with https instead of http, and it should work.
Note that you need to copy the certificate again every time you renew it.
Resources
https://tomcat.apache.org/tomcat-8.0-doc/ssl-howto.html
https://github.com/rmbolger/Posh-ACME/tree/2642b92f109f0dd60bf7bc6940a3ade6a6a3db36